If you are looking for a new Kodi add-on for free video streaming or an alternative to your existing one, then Phoenix Rises is the add-on for you. Not only it offers a vast library of top-rated movies and TV shows but also live TV channels, kids, and PPV sports content. You get all of this without cashing out on ridiculous subscription plans.
The Phoenix Rises addon scrapes some good quality streamable links at up to 1080p. If you want to go beyond that margin of quality, then linking your Real-Debrid account with the add-on is your best bet for finding premium 4K Ultra HD stream links.
In this article, we will walk you through the installation process of the Phoenix Rises addon on Kodi (v18.x Leia), including some additional simplified instructions for setting it up and using the add-on. The guide provided below also works on amazon fire TV, Firestick 4k and all other devices that support Kodi
How to Install Phoenix Rises Addon on Kodi
Contents
Most of the Kodi Addons/Builds, developed by third-party developers, will give you unrestricted access to a lot of movies and TV shows. However, you must be cautious while using Kodi Addons and safeguard your identity. There’s always a risk of being monitored or tracked by Internet Service Provider (ISP) and government. Usage of Kodi Addons and builds for streaming copyrighted content might land you in trouble. Therefore, it’s recommended to use a reliable VPN app for safety reasons.
Using a VPN connection will also help you in bypassing geo-based restrictions. We recommend our readers to use IPVanish VPN while streaming. IPVanish VPN cleverly hides your identity by masking your IP address. Additionally, it comes with a 7-day money-back guarantee, you can raise a refund request in case if you’re not happy with the service. Click Here for IPVanish VPN @ 69% Off
Installing an add-on from the default Kodi repository is pretty easy. On the other hand, third-party Kodi add-on installations are much complex and require you to install the necessary repository beforehand. The steps are separated into three sets to avoid a cluttered mess and help you understand the whole process.
#1. Enable Unknown Sources on Kodi
- First of all, launch the Kodi application on your streaming device,
- Next, click the cogwheel icon located above the sidebar. It is right under the Kodi logo. It will bring up the System page.
- On the System page, select the System option under the Settings section.
- After that, highlight the Add-ons tab and toggle the slider next to Unknown sources.

- A window prompt will ask you once again to confirm your actions. Click Yes to allow the installation of third-party add-ons.
#2. Install the Team Falcon Repository
- Return to the System page and select File manager.
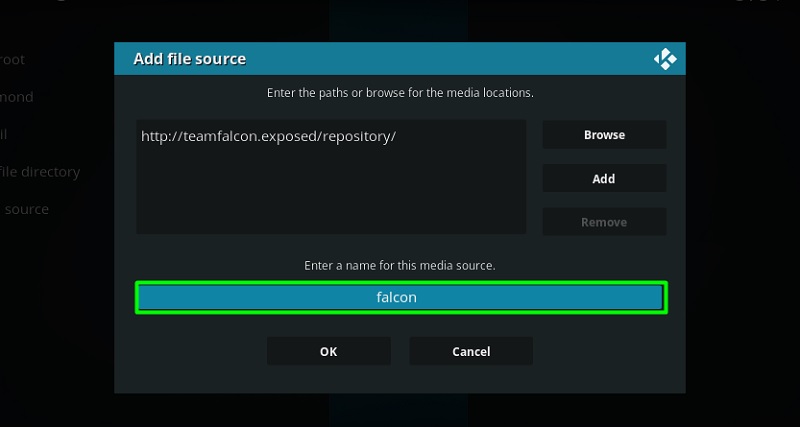
- Click Add source, then click <None> in the following window.
- Enter this URL: http://teamfalcon.exposed/repository/ in the text field and click the OK button on the right of the keyboard.
- Name the media source Falcon and click OK.
- Return to the System page and click the Add-ons You will be redirected to the Add-on browser menu.
- Select Install from zip file from the Add-on browser menu.
- Choose Falcon from the list of file sources.
- Now click the repository.falconRepo.zip file in the parent folder.
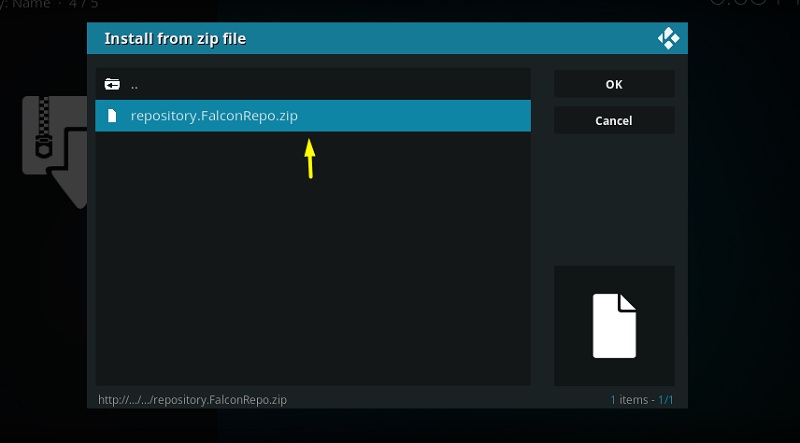
- In a minute, the “Add-on installed” notification will confirm the successful installation of the Falcon Repository.
#3. Install Phoenix Rises Kodi Addon
- From the Add-ons / Add-on browser page, click the Install from repository
- Select Falcon Repo (by Team Falcon)
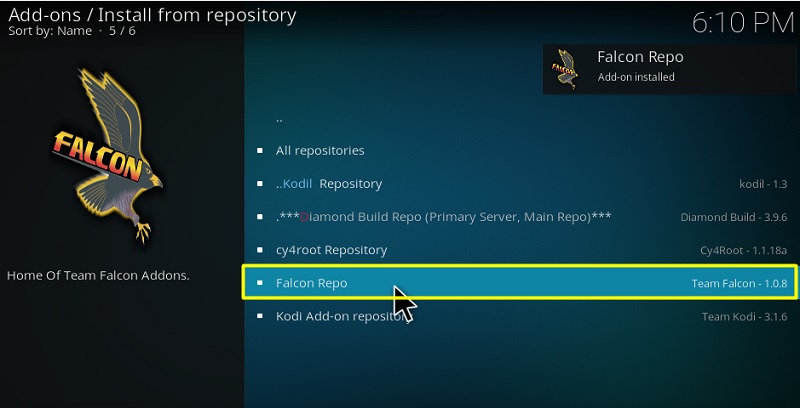
- Video add-ons, and choose Phoenix Rises from the list of video add-ons.
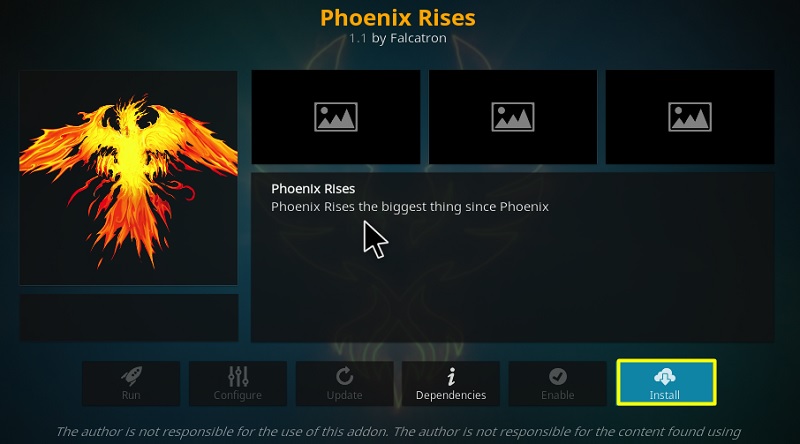
- Click the Install button under the add-on artwork and description. Click OK again to begin the installation.
Once the confirmation message for the installation appears, go back to the Kodi home screen, and click the Add-ons option. You will find the Phoenix Rises addon under the Video add-ons section.
How to Use The Phoenix Rises Addon
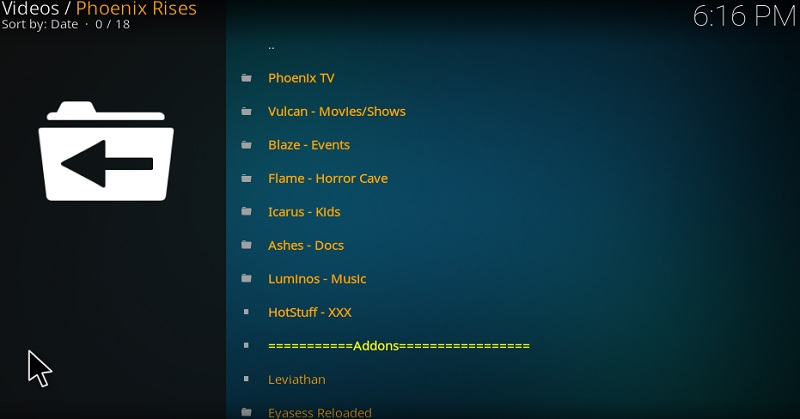
Launching the Phoenix Rises add-on will first introduce you to the main page. Some of the options are Phoenix TV (Live TV), Vulcan (Movies & TV shows), Luminos (Music), Blaze (PPV events), Icarus (Kids section), and Ashes (Documentaries).
Before you start streaming, follow this guide to disable metadata processing on the add-on. Metadata processing often increases loading time while searching for content, so keeping it disabled will make the loading times faster.
- Select Options under the Phoenix logo.
- Click Add-on settings under the Actions section.

- Toggle off Enable Metadata in the Customization
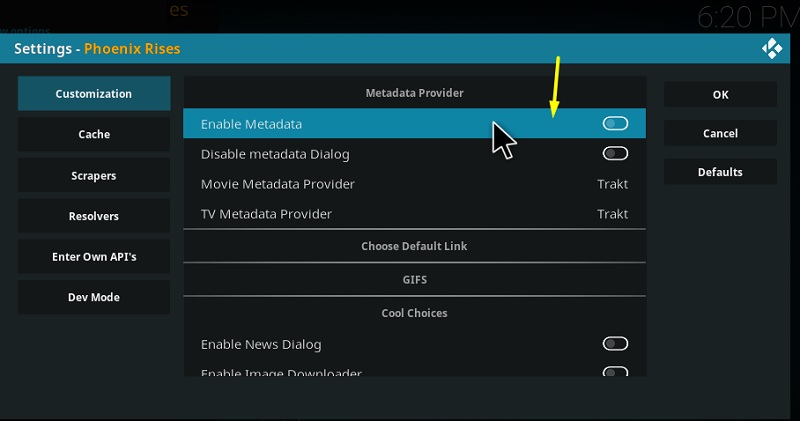
- Click the OK button on the right of the window.
From the same window, you can link your Real-Debrid account to get access to premium streamable links. Here’s how:
- Highlight the Resolvers tab on the Settings window and click Open Resolver Settings.
- Next, click the Universal Resolvers tab, select Priority under the Real-Debrid section, and change it from 100 from 90.
- Select the (Re)Authorize My Account option in the same section. A unique code should show up in a window. Make sure to follow the next steps quickly as the code expires in 2 minutes.
- Visit https://real-debrid.com/device using a web browser on any of your devices.
- Enter the unique code, click Continue and finish the sign-in process. A notification from ResolveURL in Kodi will confirm the Real-Debrid authorized.
You can now enjoy movies and TV shows via the Phoenix Rises Kodi add-on.
Related
- How To Install Yoda Addon on Kodi
- How to Install IT Kodi Addon
- How To Install The Crew Addon on Kodi
Conclusion
This guide covers the step-by-step installation and setup process of the Phoenix Rises addon on Kodi. It is a decent video streaming add-on with a respectable collection of movies, TV shows, documentaries, kids, and sports content. It also lets you watch a few live TV channels, but don’t expect much from the stream quality. If you are encountering any issues following the installation process, then write it down in the comments below. We will quickly reach out to you with a solution.