Kodi is a great media player to have on whatever device it is that you have. One of the best things Kodi has to offer is its wide range of Builds. You probably are looking to install one and want to know, how. Well, you have come to the right place. In this post, I will talk about how to Install Doomzday build on Kodi under 5 minutes.
The same guide also works on firestick, fire tv, firestick 4k, android, windows PC & all other Kodi supported platforms.
I personally use IPVanish VPN for my Kodi. The ISP (internet service providers) & governments across the world monitor the online activity of their users. If they Found copyrighted content on your device, you could get into trouble. IPVanish VPN helps you to mask your IP and secure your privacy online.
Your privacy is your right! Get IPVanish VPN and protect your online privacy.
Read here – why you must use a VPN all the Time
How to Install Doomzday Build on Kodi
Contents
The whole process is not that difficult and it would take only about 5 minutes for an average guy to finish it. But it does have a lot of steps to it. Basically, you will have to do these three things:
- Enable the Unknown Sources
- Install Doomzday Wizard
- Installing Doomzday Kodi build.
Also, Check – How to install Titanium Build On Kodi
Enabling The Unknown Sources
This is kept disabled beforehand to protect you from viruses and malware.
- First, you have to get to the Kodi Settings. This is quite easy you will see the settings icon on the upper left side of the home screen.
- If you have a version 18.5 Kodi or lower then select System. If it is a version 17.6 then System Settings is where you wanna go.
- There will be several options on the left pane. From these choose Add-ons.
- Next, you will see Unknown Sources. Use the toggle to switch it on.
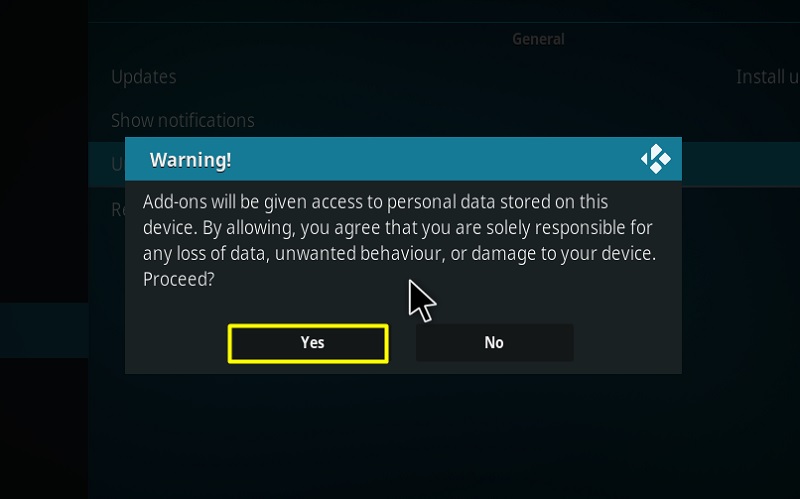
- You are probably seeing a waring screen right now. Go on right ahead and dismiss it by choosing Yes.
Installing The Doomzday Wizard
- Go to the Kodi Settings just like before.
- This time around choose File manager.
- Next, you have to open the Add source option.
- A screen will appear asking you to enter the path towards the source. You just have to choose <None>.
- A window with an onscreen keyboard will open up. In the space provided type in this URL: http://doomzday.xyz/Doomzday
- After that, choose the OK option.
- You have just added a media source and you are gonna have to name it. You can choose a name you like or just go with Doomzday itself.
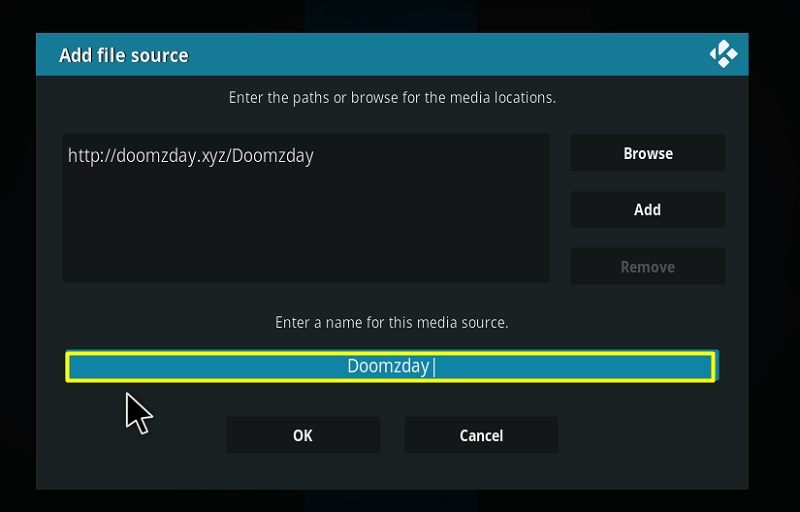
- Again, choose the OK option.
- Hit the back button till you get to the Kodi Setting screen. Or you can go to the home screen and select settings from there.
- Look for Add-ons and open it.
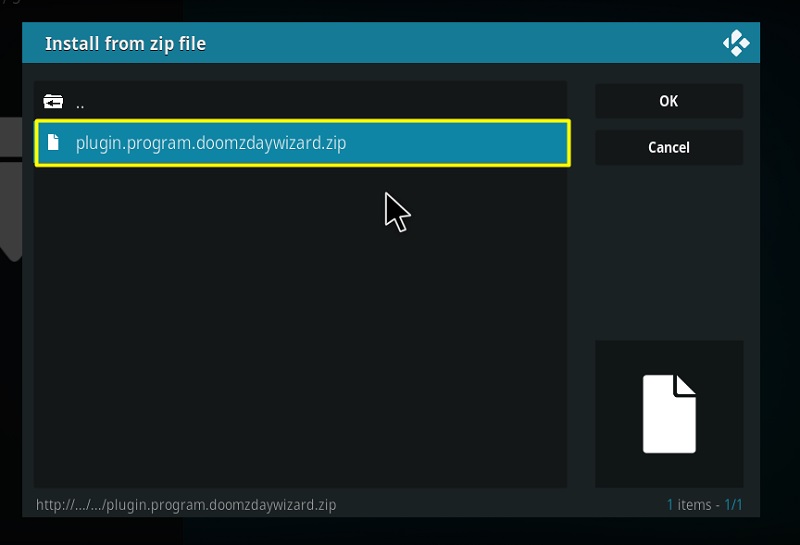
- Now, select the Install from zip file option.
- From the list of things that appears, open the source name that you typed in earlier.
- The zip file for Doomzday Wizard will appear. It will look something like this.plugin.program.doomzdaywizard.zip
- Click it and it will initiate the installation process. Kodi does not display the installation progress but you will get a notification once it is complete. It will take a few seconds.
- On clicking the notification, a Doomzday Updates screen will appear. Just avoid it by choosing Dismiss.
- On the next pop up screen choose Continue.
- From the next screen that appears next, you can either select the Build Menu to choose the build that you want to install. Or you could just hit Ignore and we can move on to the next part.
Installing Doomzday Kodi Build
- Get back to the home screen and choose Add-ons.
- Choose Program Add-ons.
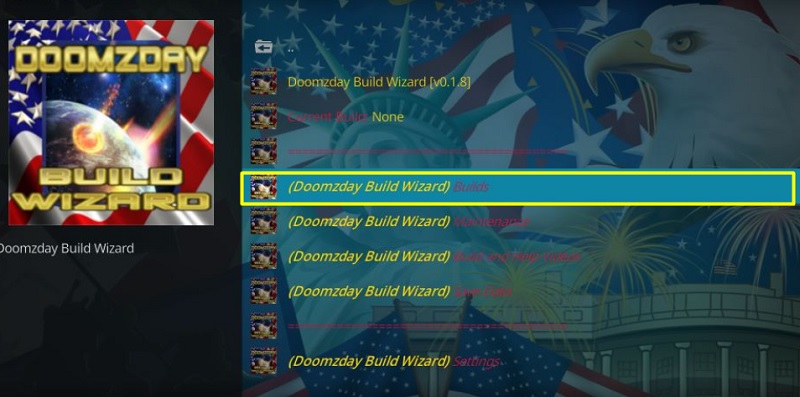
- Now select the Doomzday Build Wizard.
- Choose the one with the Builds.
- From the list that appears, choose a Build of your liking.
- Click on Fresh install. You can choose with Standard install as well.
- If you went ahead with Fresh, then you will see a prompt screen. Choose Continue.
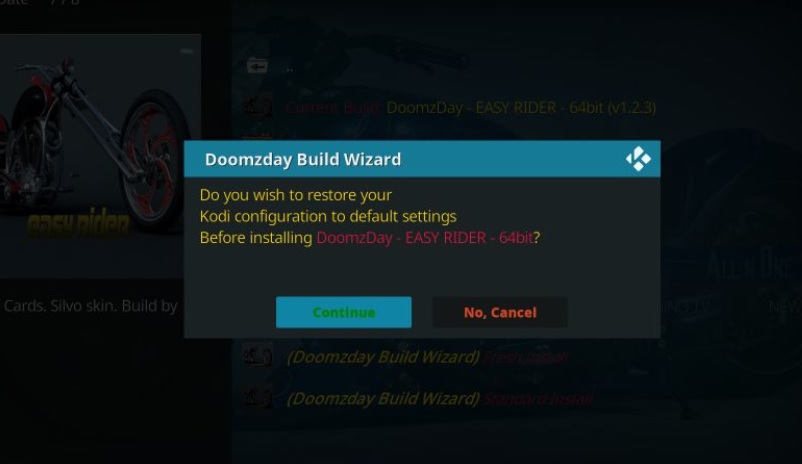
- Your build will now start installing. After that, another prompt will appear. Choose Force Close.
- This will cause Kodi to close. Restart it to check out the build that you just installed.
Conclusion
Builds are a great way of tinkering around with your Kodi. In this article, we have covered it’s simple but a little lengthy installation process of Doomzday Kodi Build. All that’s left to do is to enjoy the Build you just installed.