In this guide, you are going to learn the step by step process to install Fen Addon on Kodi. The Guide provided here also works for Firestick, Fire TV Cube, Android, Windows PC, iOS, Mac Computers & all other Kodi supported platforms.
There is a large number of unofficial video streaming add-ons for Kodi on the web intended to bring users the latest films and shows from various sources. However, it can get stressful when you try to choose between multiple add-ons. Every add-on has its own set of pros and cons. Some may require more storage and memory space, while others don’t have enough content. This is why we are showcasing the FEN Kodi addon in this guide. You can continue reading to know more and see how to install FEN Addon on Kodi.
What is FEN Kodi Addon?
Contents
An add-on is meant to add particular functionality to Kodi. The FEN add-on does just that by providing users a constantly refreshed library of on-demand movies, TV shows, and more.
Similar to other video streaming add-ons, the integrated web scraper does all the work of finding direct playback links from file hosting websites and adds it to its ever-expanding database. The web scraper used in FEN is the same as Exodus Redux.
The FEN Kodi add-on not only uses web scraper but also integrates premium Usenet providers like Furk, Easynews, and Real Debrid for pulling high-quality direct stream links from private hosted servers. Remember that all of them require logging in with your account for getting access to those premium services. You can link your Trakt account with FEN too.
In fact, it has cached torrent support, making the FEN add-on stay one step ahead of its competition. You will regularly stumble upon 1080p and 4K direct streams for your preferred content.
The text-based user interface consists of nested folders. On the home screen, you will find the following options: Movies, TV Shows, Music, Search, Furk, My Trakt Lists, Favourites, Subscriptions, Watched, In Progress, Downloads, Kodi, Library, Tools, Settings. It is very simplified in nature, so you won’t have much trouble finding your content.
The FEN Kodi add-on is compatible with Kodi v17 Krypton, and v18 Leia.
Most of Kodi users are installing illegal Kodi addons & Build. So, Before Streaming through Kodi, Make sure you use a VPN. Currently, Your IP address is visible to everyone. Even, Your ISP (Internet Service Provider) and the government are tracking all your Internet Activity. If found streaming copyrighted & illegal content on your Kodi, you could get into serious trouble.
If you are planning to stream content via any of the Kodi addons or Kodi builds, I strongly suggest you, Use IPVanish VPN and secure yourself. It hides your identity and also helps in geo-blocked content. I have tried tons of paid VPN and found IPVanish VPN to be the best VPN for Kodi & Fire Tv Stick. It is one of the most fastest and secure VPN in the world.
The customer support is also good and IPVanish VPN offers a 7–day money-back guarantee to all customers. Click on this link to Get Off IPVanish VPN
This offer will expire soon…
How to Install FEN Addon on Kodi
Installing Add-ons from the official Kodi Repository is extremely easy. However, it’s the opposite when you need to install add-ons from third-party sources or repositories. You can follow our simplified step-by-step guide to install the FEN Add-on on Kodi. There is a lot of steps for you to follow, so make sure you take your time and do what the guide says accordingly.
Enabling Unknown Sources on Kodi
We will begin this guide by enabling third-party add-on installations on Kodi. Simply follow the steps below.
- On the Kodi home screen, click the cogwheel icon on the left sidebar. It brings up the Settings menu.
- Select System Settings (v17 Krypton) from the options or System (v18 Leia).
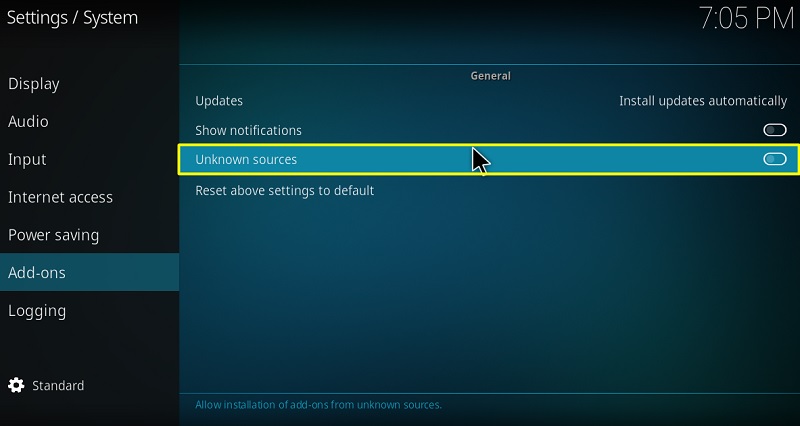
- Now highlight the Add-ons tab from the sidebar, then toggle on Unknown Sources.
- Click Yes to ignore the warning box.
If you have successfully done it, you can now install add-ons from third-party sources.
Installing the Required Repository
You won’t find the FEN Kodi addon from the official Kodi Repository. This means you have to add the required repository first. Here’s how to do it:
- Return to Kodi’s Settings menu and select File Manager
- On the next page, choose Add Source.
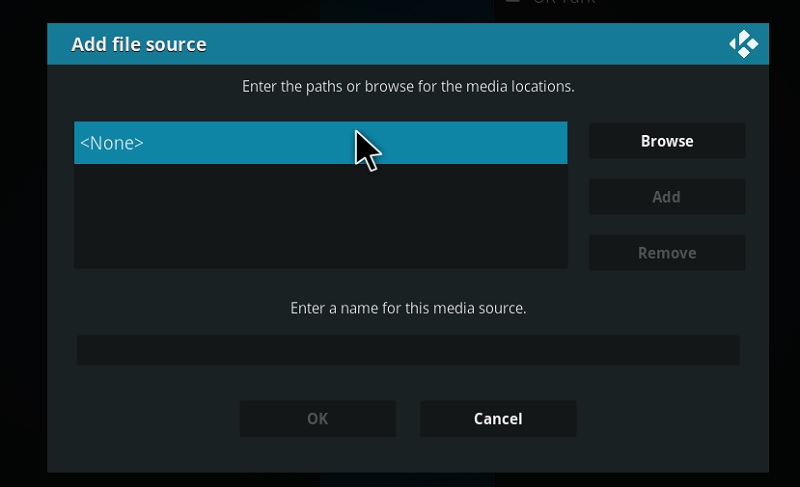
- A pop-up window will show up. Click <None> in the window box.
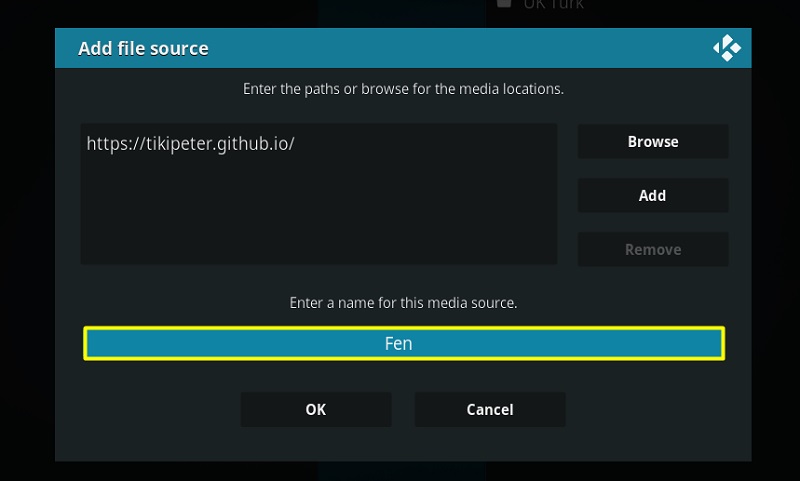
- Kodi will need you to enter the path for the media locations. Here enter the following URL: https://tikipeter.github.io, then click OK.
- Enter the name of the media source on the pop-up window. Type “Fen” for reference or any other name. Click OK to add the source.
- Go back to the Settings menu again, and select Add-ons from the row above.
For Kodi Krypton users, select Add-ons from the Kodi home screen and click the opened-box icon located at the top of the sidebar.
- Next, choose Install from zip file.
- Select Fen or what you have named the source previously.
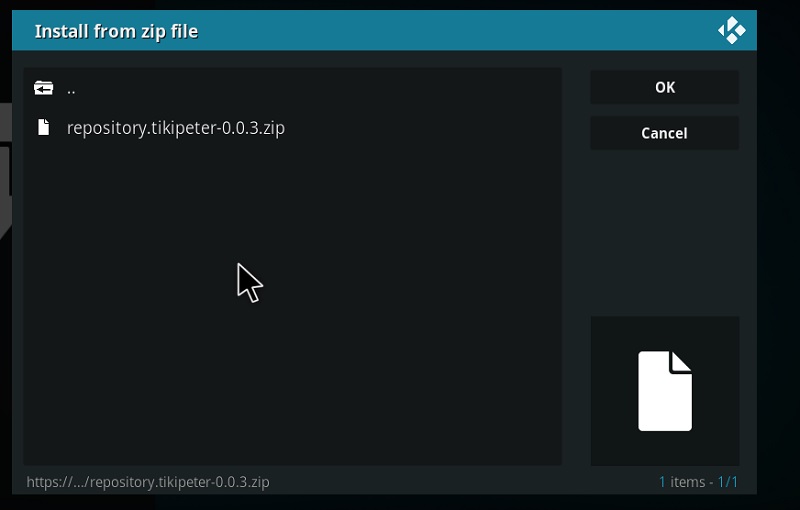
- Select the tikipeter-0.0.3.zip file from the source folder to install the repository. A notification will soon confirm the successful installation.
Installing the FEN Kodi Add-on
Now that you have managed to install the required repository, the rest of the steps are going to be relatively more comfortable for you to follow.
- Click Install from repository from the Add-ons page.
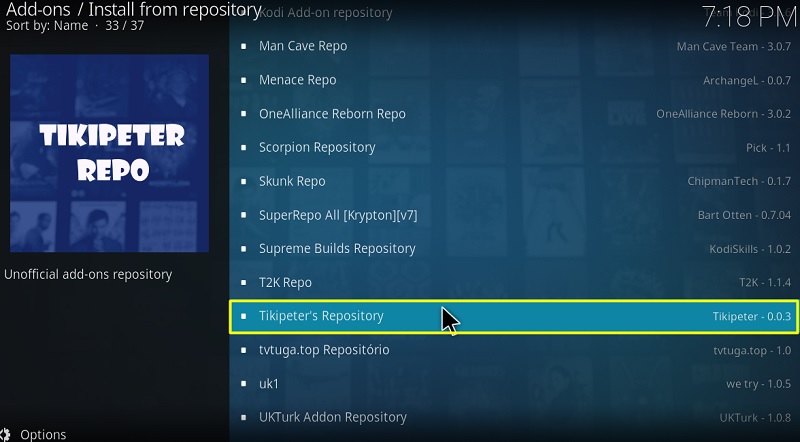
- Choose Tikipeter’s Repository
- Click on Video add-ons.
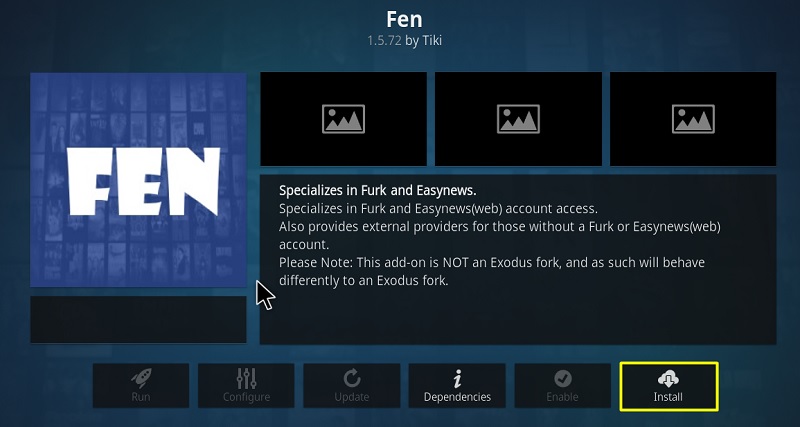
- Finally, select Fen and then click the Install
- Kodi Leia users will encounter a pop-up asking to install additional add-ons. Click OK to continue the installation.
After you receive the “Add-on installed” notification, return to the Kodi home screen. Then highlight Video add-ons to launch the FEN add-on.
Related
Wrapping Up
In this guide, we have provided detailed steps for installing the FEN addon on Kodi. This guide works for all the Kodi platforms such as Windows, macOS, Linux, FireTV OS, Android, and iOS. Following the steps will hopefully help you install FEN Kodi add-on and stream your favorite content.
Note: We do not have the sources to verify the legitimacy of the Kodi add-on mentioned here. So proceed with caution before you install it on your device. We won’t be responsible for any damages or data loss.
