In this article, I will guide you through the detailed and simple process to install Rising Tides addon on Kodi. The same instructions also work on FireStick, Fire TV, Android TV Box, Windows, MAC PC and all other platforms on which Kodi is supported.
Now that cable TV broadcasting services are finally embracing the era of online content consumption, new streaming platforms are being introduced almost every day. Major sports broadcasters like ESPN and WWE now have their own subscription-based streaming services.
Although online subscriptions are more affordable compared to normal cable TV, having several subscriptions significantly bumps up the monthly expenses. Kodi users can avoid that by using free streaming add-ons.
As some of you may already know, there aren’t many third-party Kodi add-ons for sports-related content. One of the most popular sports streaming add-ons is SportsDevil, which has been the only choice for sports content for quite some time now. However, it sometimes struggles to keep up its pace due to the shutdown of several stream sources.
The Rising Tides addon is a worthy alternative to SportsDevil because of its decent collection of sports channels, exclusive PPV events, and highlights. The developers refresh the sources and add new channels frequently to keep the add-on fresh for users. In terms of quality, the stream runs smoothly in both SD or HD resolution. But your mileage may vary depending on the server distance and internet connection.
You can follow the installation guide below to install the Rising Tides addon on Kodi. It works with v17.6 Krypton and newer versions of Kodi.
How to Install The Rising Tides Addon on Kodi
Contents
Most of the Kodi Addons/Builds, developed by third-party developers, will give you unrestricted access to a lot of movies and TV shows. However, you must be cautious while using Kodi Addons and safeguard your identity. There’s always a risk of being monitored or tracked by Internet Service Provider (ISP) and government. Usage of Kodi Addons and builds for streaming copyrighted content might land you in trouble. Therefore, it’s recommended to use a reliable VPN app for safety reasons.
Using a VPN connection will also help you in bypassing geo-based restrictions. We recommend our readers to use IPVanish VPN while streaming. IPVanish VPN cleverly hides your identity by masking your IP address. Additionally, it comes with a 7-day money-back guarantee, you can raise a refund request in case if you’re not happy with the service. Click Here for IPVanish VPN @ 69% Off
As Rising Tides is a third-party add-on, it requires users to go through a complicated process to install it on Kodi. We have done our best to keep it simple for beginners, with each set of instructions divided into three major steps. Following this guide will help you install other Kodi add-ons in the future as well.
Turn on Unknown sources
- Open Kodi on the streaming device.
- Start by clicking the gear-shaped icon on top of the sidebar. It brings up Kodi’s System
- Next, click System settings if you use Krypton. Users with the latest Leia version will need to click System on the bottom row of the page.
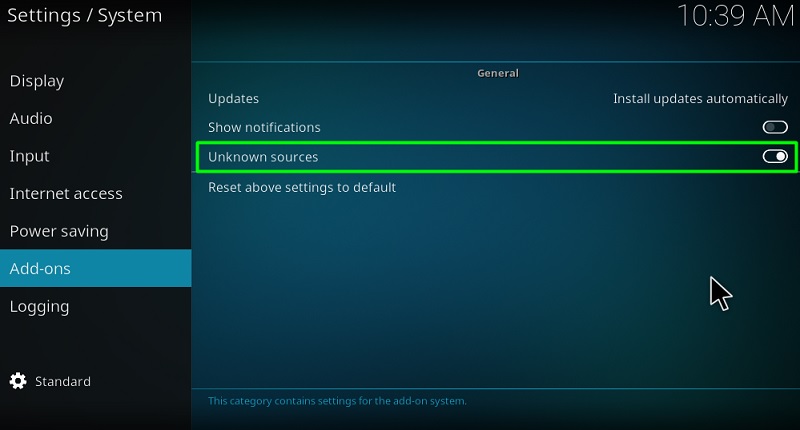
- Scroll down to Add-ons in the sidebar, then toggle on the slider for Unknown sources on the right.
- Click Yes to agree to the warning message.
You can now proceed to install the third-party repository, as Kodi won’t verify the source.
Install Rising Tides Repository
- Click File manager on the System page.
- Select Add source below the options. A window should appear on-screen.
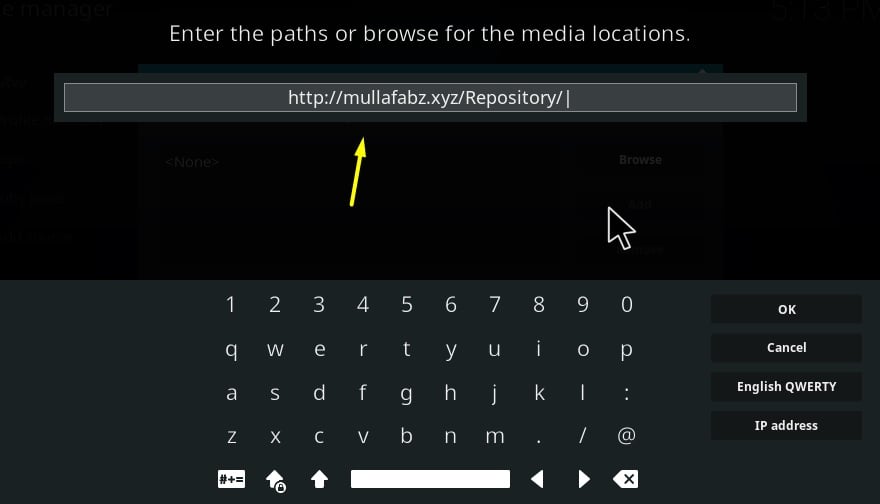
- Select and click <None>, enter http://mullafabz.xyz/Repository/ in the text box, and click OK.
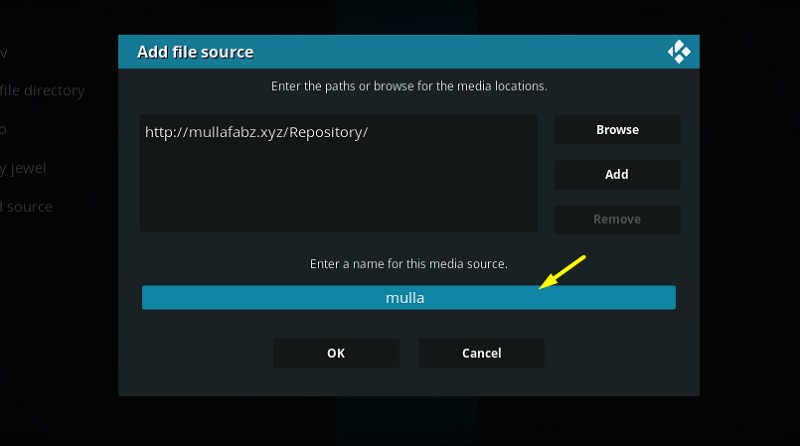
- Select the text box at the bottom of the window and type in “mulla.”
- Click OK to save the file source.
- Go to the Add-ons page from the Kodi home screen, then click the opened-box icon on the top-left corner to access the Add-on browser page. Leia users can quickly access it from Kodi’s System page > Add-ons.
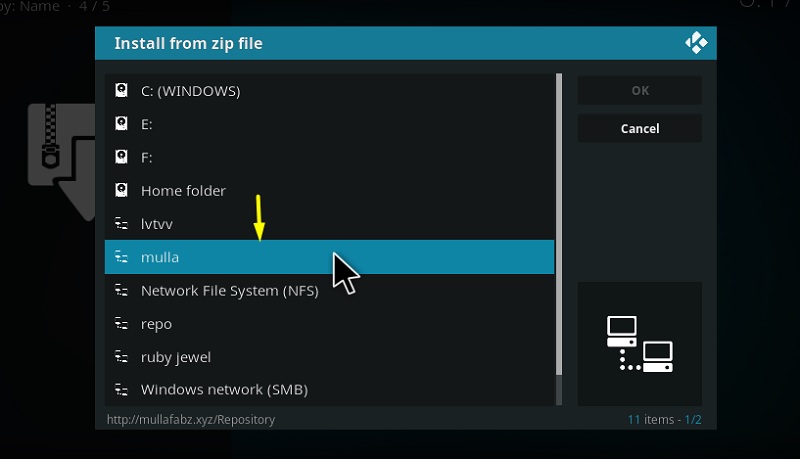
- In the Add-on browser page, click Install from zip file and select Mulla from the options.
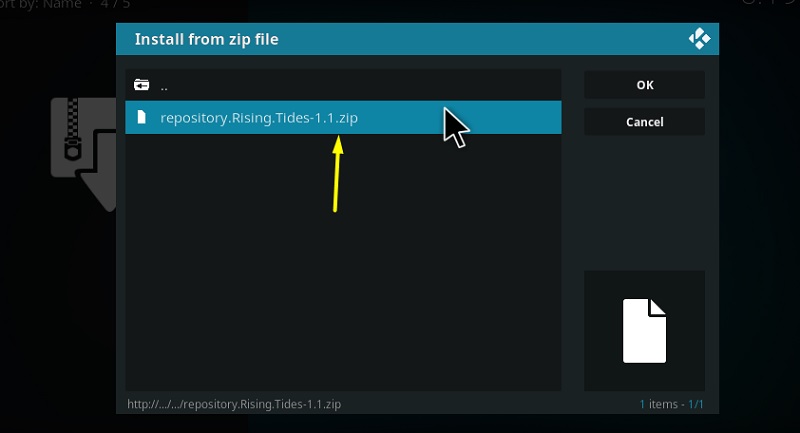
- Now click the Rising.Tides-1.1.zip file.
An “Add-on installed” message will pop-up shortly. The installation of the Rising Tides repository is now successfully done. Follow the final steps below to install the Rising Tides Kodi addon.
Install Rising Tides Addon
- Click Install from repository on the Add-on browser page.
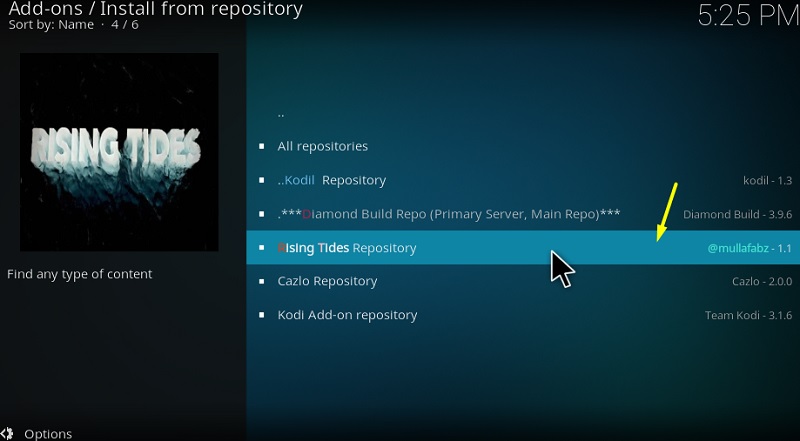
- Choose Rising Tides Repository from the list of repositories.
- Select Video add-ons and then Rising Tides on the following page.
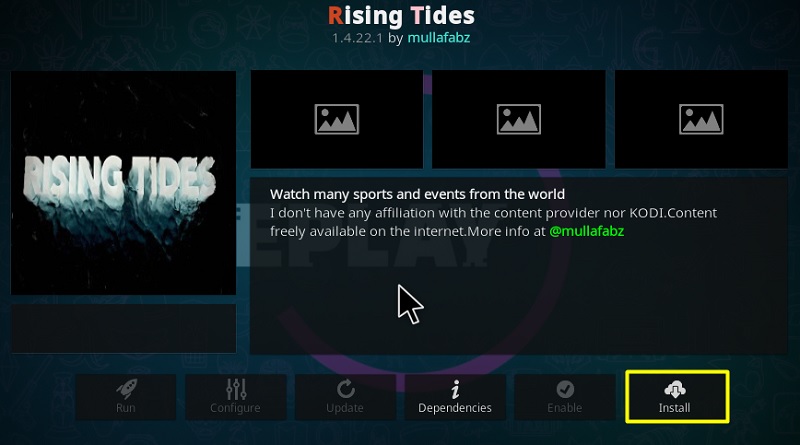
- Hit the Install button and wait for the “Add-on Installed” message to show up.
- If you are on Leia, you will need to click OK again to begin the installation.
Once it’s done installing, return to the Add-ons page on the Kodi home screen to launch the Rising Tides add-on.
Rising Tides Addon Overview
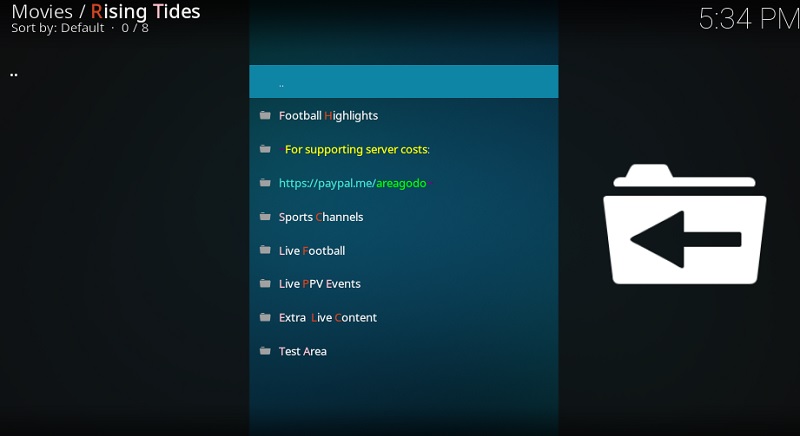
Upon launching the Rising Tides Kodi add-on, you will be introduced directly to the main menu. There are a couple of categories found in the main menu, which includes Football Highlights, Sports Channels, Live Football, Live PPV Events, Extra Live Content, and Test Area.
Assuming that you have already figured it out, the live channels are found in the Sports Channels category. The Live Football category is dedicated to football sport only.
Live PPV Events show you a list of upcoming PPV-exclusive sports events, such as boxing and wrestling.
Final Words
This guide covers the installation process of the Rising Tides addon on Kodi. If you encounter buffering and playback issues, then try out another stream source. Rising Tides offers several sources to the users. You can also connect to a VPN to see if it works, as some ISP intentionally blocks such stream sources.
Important: We neither are associated with the service nor promote it to be a legal method of streaming content. This article is written for educational purposes only.
